 Save
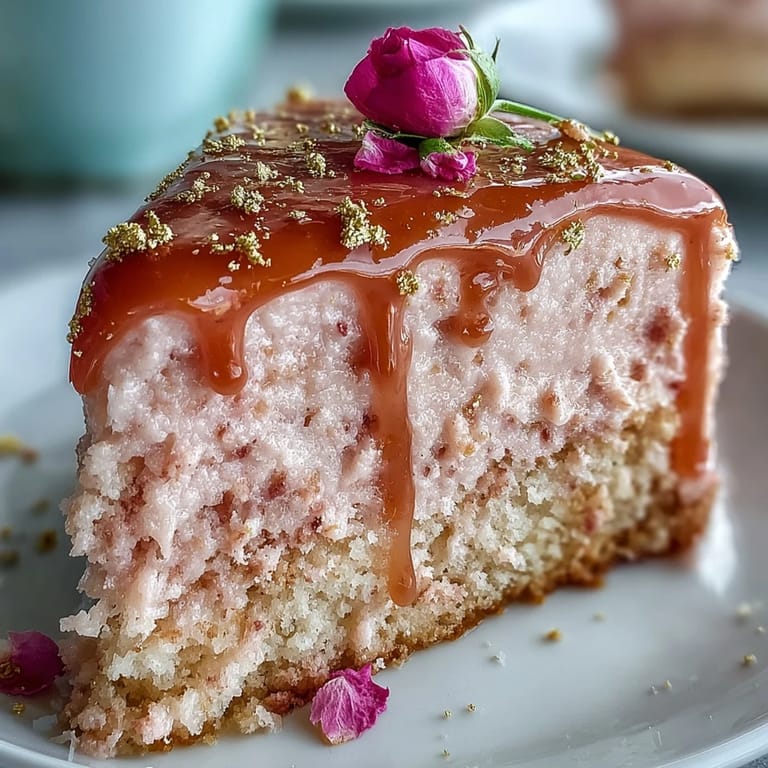
Save The scent of rosé hit me first, fizzing lightly in the air as I mixed the batter for this cake on a bright spring morning. I’d just cleaned up a splash of pink behind the mixer when I realized how much joy there is in a little kitchen chaos—especially when preparing a cake destined to sparkle at a friend's bridal shower. Something about the combination of chocolate, cream cheese, and blushing gold made the whole kitchen feel ready for celebration. Honestly, few desserts bring such instant elegance, yet still fill the air with giggles and anticipation. This Rosé Velvet Cake with Gold Drip isn’t just for the eyes—it’s an experience from first whiff to last crumb.
Last spring, the kitchen became command central as bridesmaids helped fill piping bags and dust the gold drips, each of us sneaking tastes of both the frosting and the wine. The playlist skipped, someone cracked a joke about edible glitter, and I knew this was the sort of cake that transforms an average afternoon into a memory worth retelling.
Ingredients
- All-purpose flour: The foundation—make sure to sift for a lighter crumb and we always use the spoon-and-level method for accuracy.
- Cornstarch: Just a touch, but it softens the cake’s texture, so don't skip it for that plush velvet bite.
- Unsweetened cocoa powder: Use natural, not Dutch-process—this subtle flavor boost grounds the pink hue.
- Baking soda: Essential for lift; always double check your leaveners aren’t expired.
- Salt: Balances flavors—don’t underestimate what a pinch does here.
- Unsalted butter: Brings richness to both cake and frosting, and ‘room temperature’ means slightly cool to the touch, bendable but not shiny.
- Granulated and light brown sugar: This duo creates a nuanced sweetness; I’ve learned not to sub out the brown as it adds moisture.
- Eggs: Must be at room temperature to blend seamlessly into the batter—drop them in warm water for a few minutes if you forget.
- Rosé wine: The brighter and fruitier, the better—the wine you’d drink from the bottle is perfect for the cake.
- Buttermilk: Lends a subtle tang and tenderness you’ll notice in every bite.
- Vanilla extract: Always use pure extract; imitation just doesn’t carry the warmth.
- Pink gel food coloring: If you want that dramatic blush, gel is best—it never thins the batter but brings out the celebration color.
- Cream cheese and confectioners’ sugar: For an undeniably creamy, tangy frosting—sift the sugar to avoid lumps, even when rushed.
- White chocolate chips and heavy cream: This duo makes the glossy drip that turns into a canvas for gold—melting them gently is key.
- Edible gold luster dust + clear vodka or lemon extract: The final gilded touch—apply with a steady hand and let your creativity shine.
Tired of Takeout? 🥡
Get 10 meals you can make faster than delivery arrives. Seriously.
One email. No spam. Unsubscribe anytime.
Instructions
- Prep your pans and oven:
- Turn the oven to 350°F (175°C), then grease and line three 8-inch pans—the paper peels perfectly for clean layers later.
- Sift dry ingredients:
- Whisk together flour, cornstarch, cocoa, baking soda, and salt until no streaks remain; inhale that hint of cocoa for inspiration.
- Cream butter and sugars:
- With an electric mixer, beat butter, granulated sugar, and brown sugar until it looks fluffy and pale, which takes about three minutes—don’t rush, this is where airiness begins.
- Add eggs and vanilla:
- Crack in the eggs, one at a time, beating each in before adding the next, then swirl in vanilla—pause to scrape the bowl sides.
- Combine rosé and buttermilk:
- Stir together rosé and buttermilk in a glass measuring jug; the combo looks odd but trust the process.
- Mix dry and wet alternately:
- With your mixer on low, add one third dry ingredients followed by a third rosé-buttermilk, repeating and ending with flour—add pink gel food coloring after the first round if you want a vibrant blush.
- Divide and bake:
- Spoon batter evenly into pans, smooth tops, and bake for 28–32 minutes; they’ll be springy and a toothpick should come out clean.
- Cool completely:
- Let cakes rest 10 minutes in pans, then carefully flip onto wire racks; cool until no trace of warmth remains.
- Whip up the frosting:
- Blend cream cheese and butter till creamy, slowly add confectioners’ sugar, vanilla, and a pinch of salt—keep beating until fluffy and impossible to resist tasting.
- Assemble layers:
- Stack cakes with frosting in between and around the outside, smoothing with an offset spatula; chill for 30 minutes so everything stays in place for decorating.
- Create the gold drip:
- Melt white chocolate chips and cream over simmering water, stir until smooth, let cool briefly, then drip mixture around the cake edges and chill to set.
- Paint gold:
- Mix gold luster dust with vodka or lemon extract, and brush carefully onto set drips—tiny strokes bring shimmer to life.
- Finish with style:
- If you wish, crown with edible flowers or snippets of gold leaf right before serving—cue the applause.
 Save
Save 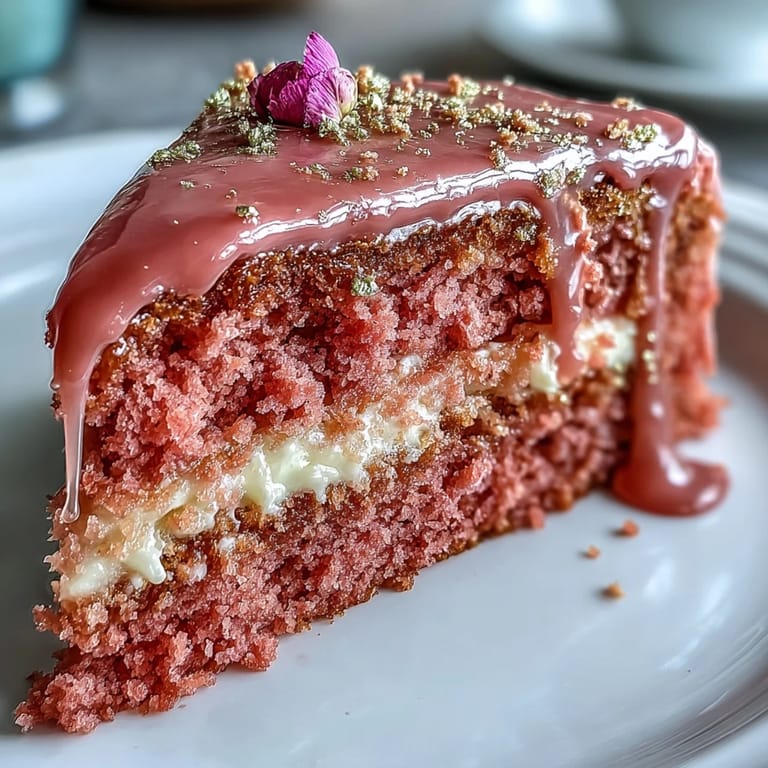 Save
Save When the bride-to-be finally sliced in, laughter bounced off the kitchen walls and everyone huddled for phone snaps of those pink velvet layers and pure gold drips. With forks clinking and crumbs disappearing, the cake suddenly felt like the centerpiece of celebration and friendship itself.
Choosing the Best Rosé for Baking
I’ll admit, I’ve tried bargain bottles and fancier vintages, and it turns out the middle ground rosé with fruity notes makes the cake flavor sing without overpowering it. Trust your nose—if it smells bright and fresh from the glass, the cake will carry those same hints, so don’t go for the cheapest or the deepest pink.
Nailing the Gold Drip Every Time
My first drip attempt was a bit runny, so now I set a timer and let the ganache cool just enough for a slow, controlled drip. If you find it’s running too quickly, stir in extra melted white chocolate until you see thicker ribbons falling off the spoon.
Making Ahead and Storing Leftovers
When prepping for busy weekends, I bake the cake layers the night before and wrap them tightly—they keep their moisture beautifully. Once frosted, the cake holds up in the fridge for up to three days, and I sometimes dust fresh gold on before serving for extra dazzle. Don't panic if you spot a little moisture on the gold drip after chilling; it dries off as the cake comes to room temperature.
- Always chill layers before frosting for the sharpest edges.
- Wrap any leftovers well so the rosy flavor stays true.
- Remember to add decorative flowers just before guests arrive.
 Save
Save 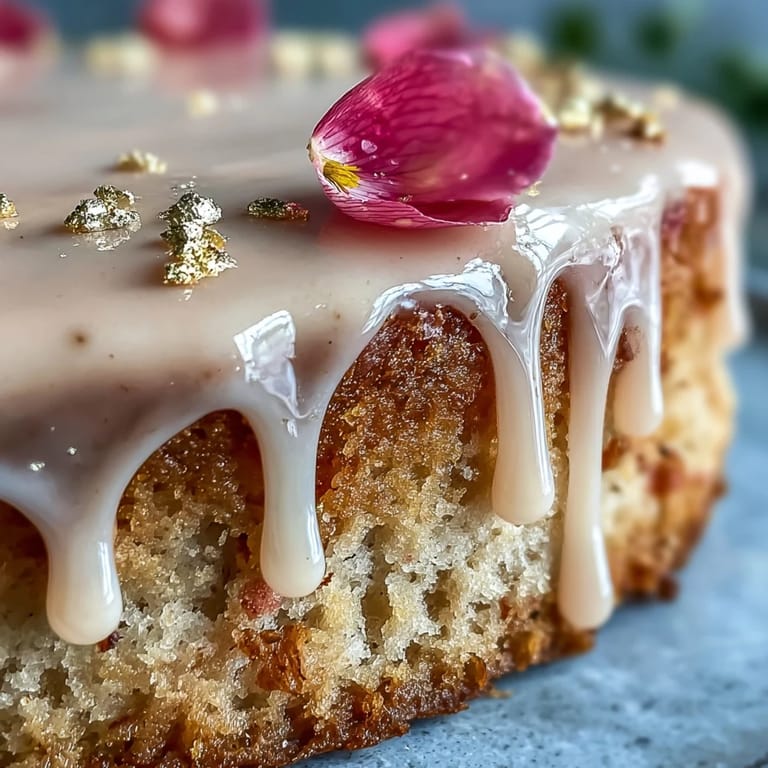 Save
Save May this golden cake bring as much sparkle to your celebrations as it has to ours and invite stories you’ll retell with a full heart. Happy baking, and may every slice feel like a toast to something beautiful!
Recipe Questions & Answers
- → Can I omit the rosé wine?
Yes — substitute equal parts pink grape juice or sparkling cider to keep the fruity note and moisture. Reduce any extra sweetness in the batter if using sweeter juice.
- → How do I get a vibrant pink crumb without overusing dye?
Use a small amount of concentrated gel food coloring and mix it into the wet ingredients for even color. Alternatively, rely on a quality rosé and a touch of beet powder for natural blush tones.
- → What's the best way to make a glossy, stable gold drip?
Make a pourable white-chocolate ganache with white chocolate and cream, cool slightly to thicken, then spoon or pipe drips. Once set, brush the drips with edible gold luster dust mixed with a few drops of vodka or lemon extract to make a shiny paint.
- → How should the cake be stored and how long does it keep?
Store covered in the refrigerator for up to 3–4 days because of the cream cheese frosting. Bring slices to room temperature before serving for best texture and flavor.
- → How can I prevent soggy layers when using liquid flavorings?
Balance added liquids by reducing other wet ingredients slightly and ensure proper bake time. Cool layers completely and chill briefly after crumb-coating to lock in structure before final frosting.
- → How do I know when the layers are done baking?
Bake until a toothpick inserted into the center comes out clean or with a few moist crumbs. The tops should spring back lightly; avoid overbaking to keep the crumb tender.